Tag Archives: diy

Spring Forward?

Is it really the end of March? If so, could someone please tell the weather patterns to start cooperating with the normal average temperatures and behaviors for this time of the year? I don’t know how much more of this dreary, snowy, rainy stuff I can take. It literally took everything in me to muster my bee-hind off the sofa yesterday, change out of my flannel pjs into sweats (yea, you read that right), and attempt to put together some springy/Eastery vignettes around the house. Who can get motivated for Easter decor when there’s two inches of snow on the ground? At this point, I firmly believe that it will be 35-degrees with grey, cloudy skies for the rest of 2013. Blah.

Anywho, here are a few signs of Spring that I sprinkled around our house…

framed felt egg -- diy, crafting -- TwoPurpleCouches.com

diy’d washi-tape eggs / framed felt egg / vase via my March UmbaBox

personalized egg -- TwoPurpleCouches.com

My grandma made the eggs in the foreground – she even personalized one for me <3

Hopefully these little signs of Spring inside will encourage more signs outside. Hopefully.

How To: Create a Gallery Wall

How to create a gallery wall

Finally! After months and months and months and… you get the picture (ha! pun intended), we finally have a gallery wall in our family room. I thought the hardest part would be arranging the frames, but the hardest part turned out to be selecting what would go up on the wall! And dealing with a certain unruly zebra pencil sketch whose dimensions didn’t want to cooperate with the frames I’d purchased.

Let me give you a breakdown of how to hang it – I found this method to be SUPER  helpful, and I would definitely use it again.

tracing

Start by tracing your frames onto paper. I’ve seen all kinds of things on Pinterest, like craft paper or newspaper. I started this after Christmas (yes, I realize that was nearly 3 months ago… I am notoriously/embarrassingly slow at completely projects), so I grabbed a pile of used wrapping paper that was, errm, still is, waiting to be recycled.

Molly Helper

If possible, employ a frame-tracing helper. An 8-lb puppy is excellent for this task, until she starts shredding all of the paper all over the floor…

wall template -- TwoPurpleCouches.com

Once you’ve got all your templates traced and cut, arrange them on your wall with tape. It was awesome how easy it was to rearrange the layout until I was happy with it. And great to see a “true-to-life” size layout instead of just doing sketches on the backs of junk mail envelopes. I had also arranged the frames & pictures on the floor, but seeing the arrangement up on the wall made it a little easier to evaluate what went next to what, how close/far apart should they be, etc.

From here, you can mark where you want the nails to go, or nail directly through the paper templates. Then get to the good part… hanging!

galleryupclose

If you’re curious, here are some details on what I chose to hang. From top left: hummingbird photo by EZ Pudewa (of Creature Comforts fame), which I purchased from her Society6 shop / watercolor tree print by Angie Vandenbogaard / culinary postcard / zebra pencil sketch from my dad’s aunt / leftover suzani fabric from my placemat project.

gallerywithdog

I like that we still have room to add onto the gallery, especially on the sides, or upward to the ceiling. I don’t feel like it’s quite “finished” yet, but at least it’s a nice little collection to start from!

Have you hung a gallery wall? Have you tried the template method? Or did another tip work really well?

PS – all of the frames came from Michaels. They offer quite a few options in a Gallery collection, and you can even find/buy templates to follow if you don’t want to create one yourself. They weren’t too pricey, but I made sure to stock up when they were on sale, or take my 40%-off coupons with me. Another reason why it took a while to put this together 😉

Pinterest Challenge: Corkboard Jewelry Display

Pinterest Challenge Winter Edition

Whew! Well, this Pinterest Challenge really lived up to its name! It was a challenge, not for skills required but in satisfaction with the results. I still don’t know if I love it, but it’s a lot better than where I ended up after the first try! So, like with many things, let’s look at where we started to understand where/how/why things ended up like they did 🙂

corkboard jewelry display - diy - crafting - pinterest challenge -- twopurplecouches.com

A few weeks ago, I saw the pin below from Cutting Edge Stencils, (the original comes from Southern Lovely).

Southern Lovely stenciled corkboard

I had an old corkboard lying around so I figured I’d give it a go. I started out by painting the frame a darker coppery color.

twopurplecouches.com

I wasn’t in love, but I thought once I added a design on the cork itself, it’d look better.

twopurplecouches.com

Not. So. Much. Once again, my crafting impatience struck. Partway through, I decided I wanted a more random pattern than a uniform one. And I was experimenting with different shades of purple. Yea…… not loving it. So, out came the black paint for a frame re-do. Then, I only had the cork to contend with. I was over painting at this point, so I tried craft paper.

twopurplecouches.com

Ugh, seriously?

In the end, my fabric scrap bin came in for the win!

corkboard jewelry display - diy - crafting - pinterest challenge -- twopurplecouches.com

And looks much jazzier than craft paper. I like jazzier.

Did you take on the Pinterest Challenge: Winter Edition? Check out more pinspiration in action from Megan, Katie, Sherry and Michelle!

Chalk Art Notebooks

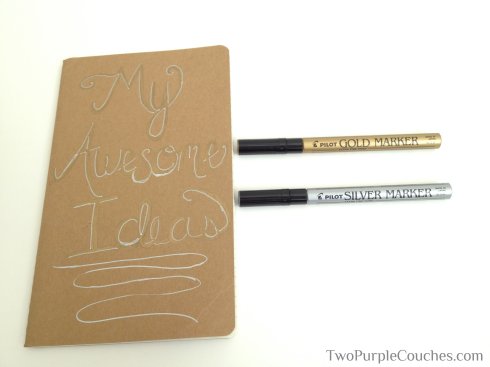
I’ve been at it again! Still loving the chalk-art look, on any surface or in any medium I can muster 🙂

paint-pen diy notebooks -- TwoPurpleCouches.com

I used paint pens to create this one. I’d love to play around with different colors and combinations of paint pens – I think the effect could be really cool!

diy notebooks -- TwoPurpleCouches.com

I used a black pencil for these; I liked the contrast with the bright washi tape.

Now that I’ve got the hang of the lettering down a bit better, I want to play with embellishing the space, with flourishes or ribbons or things like that. Have you tried chalk art lettering? Any tips to share? I’ve yet to try it on an actual chalkboard, haha!

Sharing this post at:

The Shabby Nest

DIY Washi Tape Notebooks

Washi tape seems to be the hottest thing in crafting right now. So I recently bought a few rolls to see what the fuss was all about. I don’t know if I’m hooked, but I’m definitely having fun coming up with crafts and ideas to use it! I’ve seen a few “dressed up notebooks” around Pinterest and Etsy lately, so I thought I’d try my hand at creating my own washi tape notebooks!

diy washi-tape notebooks -- TwoPurpleCouches.com

diy washi notebooks -- TwoPurpleCouches.com

washi notebooks -- TwoPurpleCouches.com

I found sets of 3 Moleskine kraft journals on Amazon for a pretty good price. I chose the kraft covers because I thought the tape would adhere best to this surface, and because the fun tape colors and patterns really pop against the neutral kraft paper! I especially love how the purples and blues look! These are my favorite combos.

dog, for scale -- TwoPurpleCouches.com

Molly was my “photo assistant” for the day. Here, she wants you to see how cute these miniature rolls of washi tape are!

Are you a washi-fan or a washi-foe? What sort of cool washi-projects have you done? I’d love to know/see pictures!

Looking for more simple crafts and gift ideas? Try these easy silver-rimmed bowls (perfect for jewelry, lip balms and small trinkets) or a set of beautiful gilded votives that can be made in minutes!


I’m linking up to:
The Shabby Nest