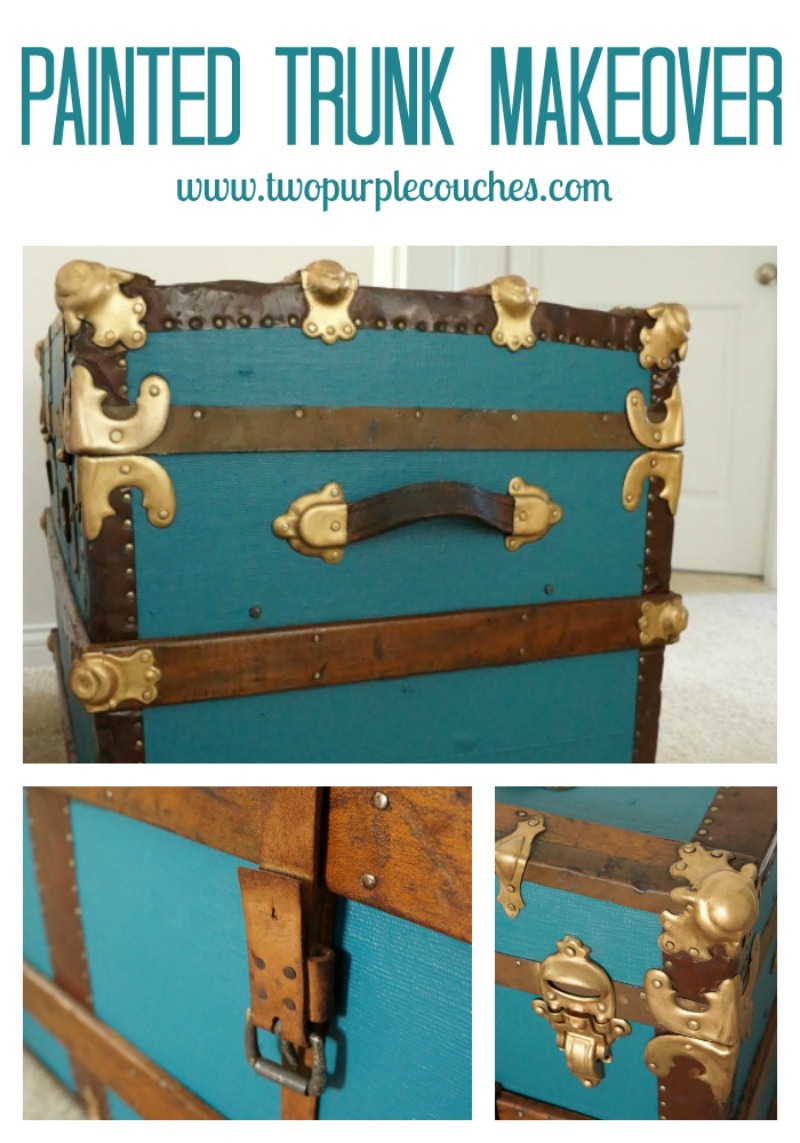
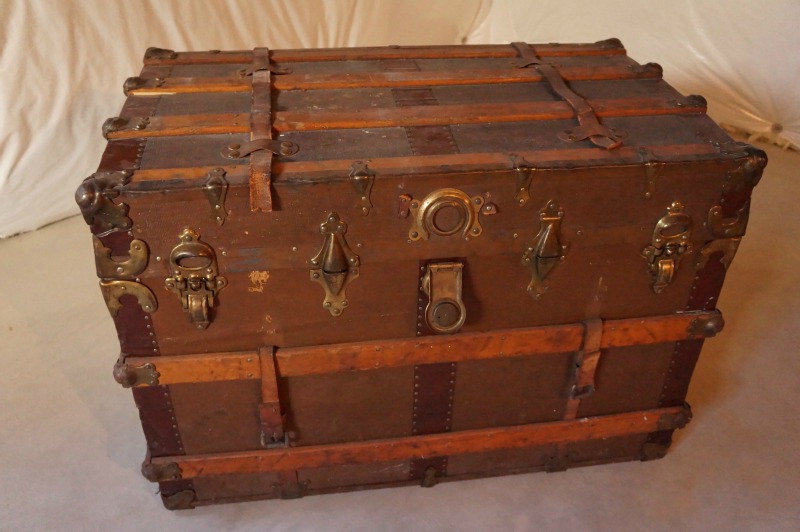
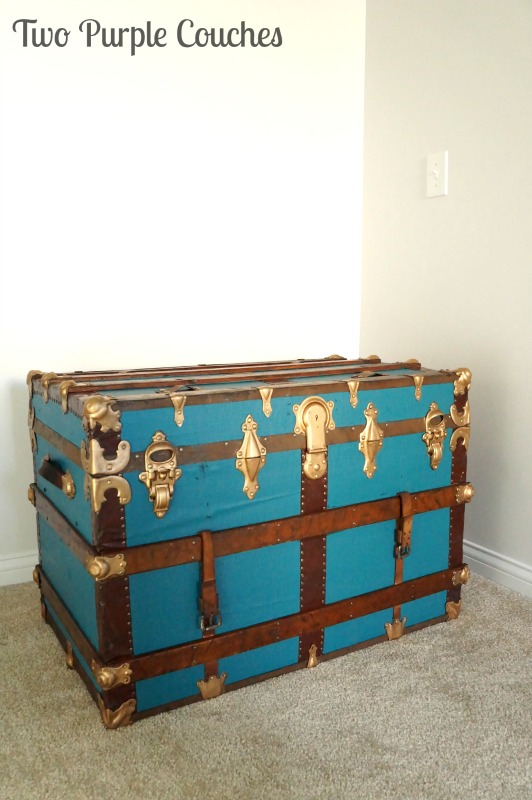
This vintage steamer trunk was all kinds of dirty and gross when I finally pulled it out of our basement to start giving it a bold, beautiful makeover. Even after a thorough cleaning, it still wasn’t shining bright like the diamond I knew it could be. It needed color. It needed depth. It needed some bling. But the biggest change, and what I’m going to share with you today, is how to paint a vintage trunk.
Now, I’ve already acknowledged that not everyone will agree with my decision to paint this trunk. And I understand that. A painted trunk is not for everyone. Especially not a bright blue painted trunk. But I wanted this piece to be something we’d love and use, and in its poor, dilapidated state, the original red-brown was just too ugly for me to love. And this trunk deserves to be loved!
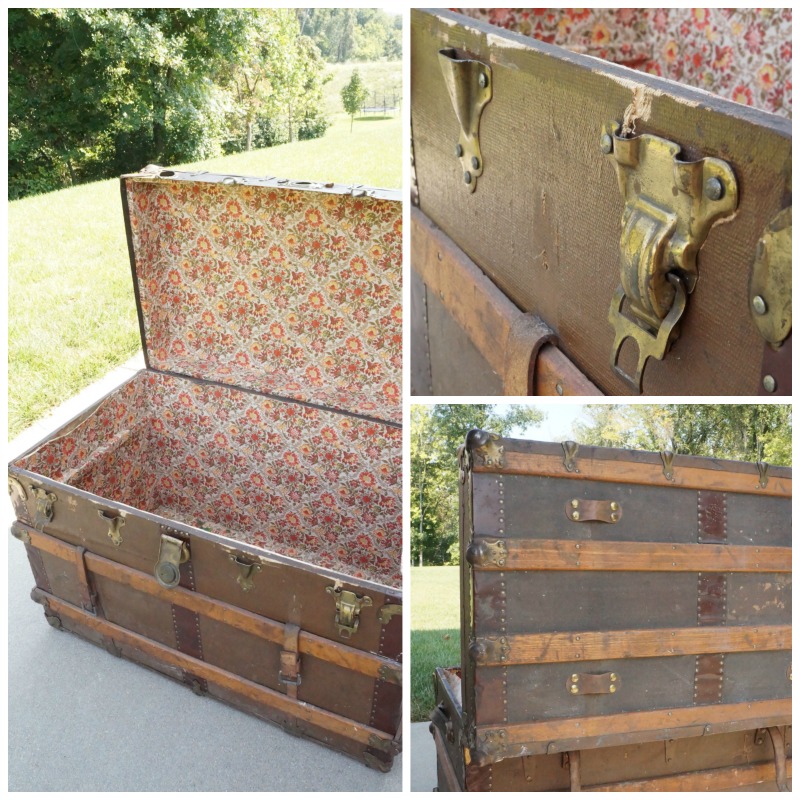
So, first things first. This trunk needed a thorough cleaning and prepping before I even cracked open a can of paint. Once I’d ripped out the 1970s fabric lining, I vacuumed the interior and exterior.
To prep the exterior, I gave all of the wood a light sanding by hand with sand paper. Then I wiped down the whole trunk with a soft cloth (an old tee is always my choice) and a solution of vinegar and water. I think I used 1 part vinegar to 4 parts water, mixed in a spray bottle. I lightly sprayed the cloth instead of spraying directly onto the trunk because I didn’t want to soak the trunk. I hauled the trunk out of our basement and onto our patio for cleaning; being outside in the sun for several hours helped to air it out and reduce some of musty smell.
Now onto the painting stage…
This post contains some affiliate links for your convenience. Click here to read my full disclosure policy.
How to make-over a vintage trunk:
Materials Needed:
- Water-based paint
- I used RePurpose Paint in Mohair Blue
- Small polyester paint brushes in assorted sizes
- Restor-A-Finish or Minwax Wood Finish wood stain
- Rub ‘n Buff Wax in Antique Gold
- Sandpaper
- You may need to start with a medium grit (60-100) and finish with a fine grit (120-220)
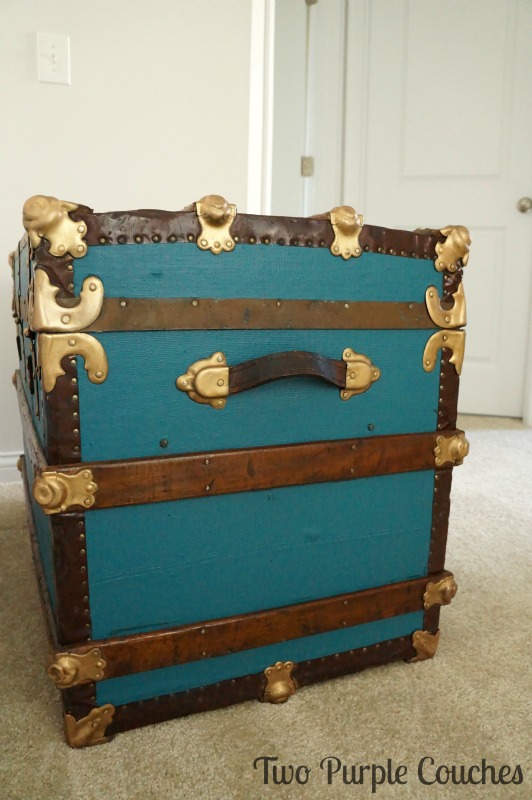
I researched several different paint brands, and ultimately decided on Cari Cucksey’s RePurpose Paint in Mohair Blue. I chose it because this paint is self-priming and works on all kinds of surfaces. It has a very smooth texture and covers extremely well. I fell in love with this rich blue color and knew it would be just the right color to make my trunk pop.
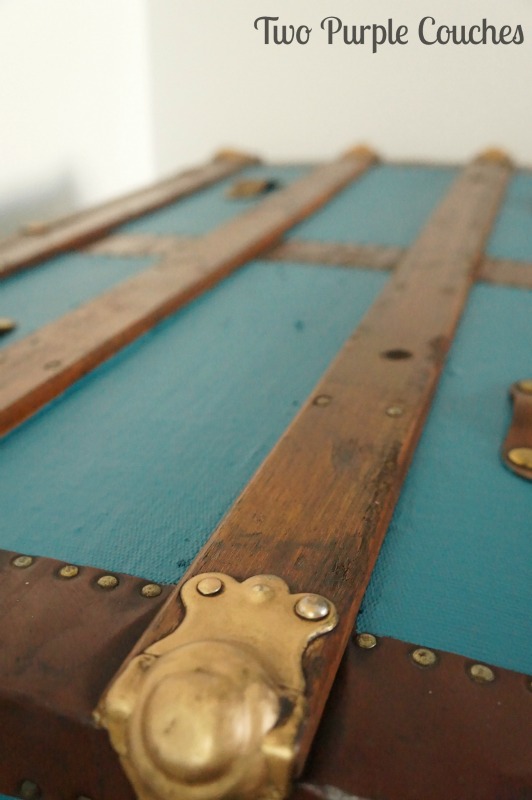
Once the trunk was cleaned and prepped, it was ready to paint! I used a small craft brush to cut in around all of the hardware and wood and a 1″ polyester brush for the larger sections. This was probably the most tedious part of the process, but I just turned on some music and got to work! I painted two coats to make sure I had solid coverage, and I barely put a dent in my quart of paint!
Once all of the reddish-brown canvas was painted over, it was time to work on the wood and the hardware. After initially sanding the wood, I applied a light coat of Restor-A-Finish in Mahogany. I gave it a few days, and then decided that the color wasn’t jiving with the beautiful Mohair Blue paint. So I headed back to the hardware store and bought a small can of Minwax Wood Finish Wood Stain in Espresso. This tone was much richer, and compliments the paint really well. I was happy to find that the stain went on pretty easily over the Restor-A-Finish, though I think another light sanding would have been a smart idea. Live and learn, right?
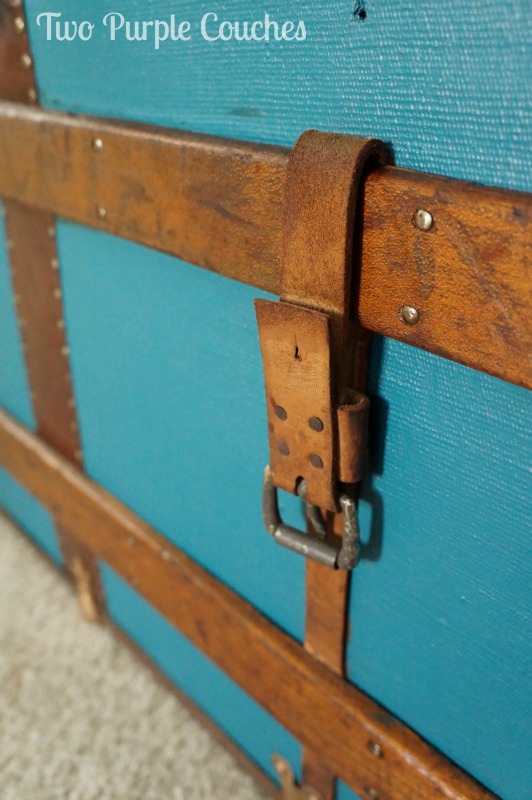
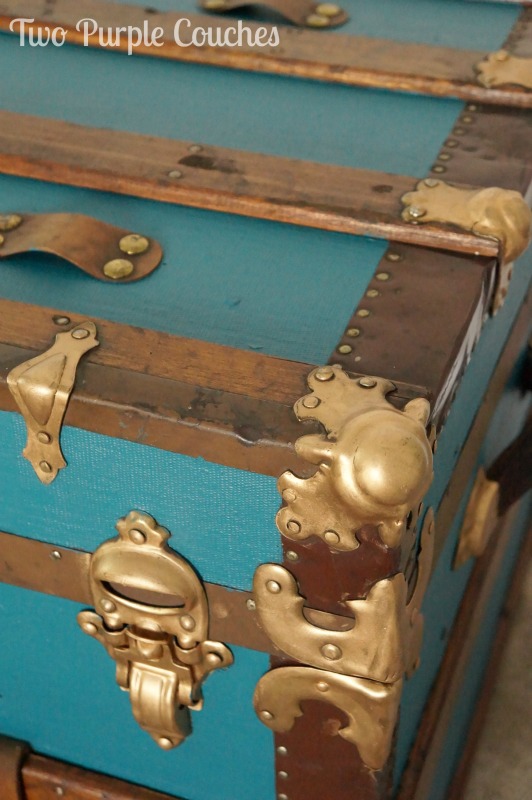
The hardware was by far the simplest part to makeover, but had the biggest impact. I applied Rub ‘n Buff Wax in Antique Gold to every. single. piece. My fingers were gold for a day or two, but it was SO worth it! I can’t believe how gorgeous the hardware is now!
It’s a bit more decorative than the hardware I’ve seen on other vintage trunks, and I love how the Rub ‘n Buff brings more attention to each piece. It totally took this trunk from blah to bold!
Looking back, I wish I’d tallied up how many hours I spent on this piece. Because it was a lot. At least 20, maybe 30 hours. Maybe more. This being my first big furniture makeover, I wasn’t sure what to expect with the process and the outcome, but after weeks of work and countless trips to the hardware store, I can proudly say that it was worth every minute!
Want to see more vintage trunk makeover goodness? Check out these posts:
Sharing with: Shabilicious Friday / Inspired By You
This turned out beautifully Emily! The paint gives the trunk new life. Your work on the wood and the hardware helped the trunk retain its vintage charm. Great work!!!!
Kelly of Simply Kelly Designs recently posted…Christmas Ornament For Nurses
Thank you Kelly! I love how much the Rub ‘n Buff accents the hardware—it’s such a fun combo of modern meets vintage 🙂
Wow, you did an AMAZING job bringing this trunk back to life! I love the color combo too….the gold really pops off that turquoise!
Christine | Where The Smiles Have Been recently posted…DIY Thankful Chalkboard & Easy Chalk Hand Lettering Cheat!
Thank you so much, Christine! It was a huge labor of love, but so worth every minute 🙂
This is such a cool piece. I love the leather, brass, and the turquoise is awesome! Thanks for linking up to the inaugural “Inspired by You” link party!
Angie @ Postcards from the Ridge recently posted…New Link Party! Inspired By You – share your projects
Thank you so much, Angie! And thank you for the fun new party 😀
I have two old trunks and was not sure if I wanted to paint them but after seeing this one I most definitely will be doing the same. Thank you for sharing! It really is beautiful
Thank you so much, Darcy! I’d love to see how yours turn out after you’re done painting them! Feel free to email me at twopurplecouches@gmail.com.
I want to know what did you do with the inside? I have a similair trunk and am debating on fabric or some other option…
Hi Kayla, I removed an old fabric liner from the inside and replace it with a new one. I used a thicker homde decor fabric and attached it using a spray adhesive. I also wrote a post about this process – just search my site for “fabric lining for a vintage trunk” and it should be the first thing to pop up! Hope this helps!
I just got trunk it is the same right down to the liner. Was wondering was your hardware gold to start with? Cause mine is black,do u know what I could use to make them look better. Thanks
Hi Patty, I used Rub ‘n Buff on all of my hardware to give it a shinier look. It was originally brass, I think, and was too tarnished to clean up or polish. You can find Rub ‘n Buff at some craft stores, or online through Amazon.
Hi there,
Did you tape off the painted canvas and hardwood prior to using Rub ‘n Buff? I’m worried if i don’t tape around the hardware the Rub ‘n Buff will get on to my freshly painted steamer trunk!
Hi Tanya, I did not tape off the canvas before using the Rub ‘n Buff. I applied it with my fingers, and I have very small fingers, so I wasn’t too worried with getting it on the trunk itself. I’d suggest taping it off if you don’t want any of the Rub ‘n Buff to bleed over!
Emily, this is gorgeous!! I, too, have an identical trunk and I’ve just started to clean and prep it. I’m making notes from your experience and they’re sure to help. My big questions are: 1) did you do anything to recondition the leather accents? and 2) does yours also have a tin bottom with little wheels? Did you use the Rub n Buff on all that as well? Or did you paint the tin plate?
Hi Jules! Thank you so much! I did use a leather cleaner/conditioner on the leather handles and straps on my trunk. My trunk also has a tin bottom with tiny wheels (a couple of the wheels are missing, though). I cleaned up with bottom with a damp cloth, but I didn’t paint it or use the Rub n Buff since the bottom won’t be seen where I have it displayed. Good luck with your trunk makeover! I’d love to see a photo when you’re finished with it – feel free to send me an email 🙂
Hi, can you tell me whether your trunk was covered in vinyl on the exterior?
Hi there – for the parts of the trunk that I painted, I would describe the feel of the material as more of a canvas than vinyl.
Thankyou.
You’re welcome!
Your makeover on the trunk is Beautiful and your directions will give me a start for mine. I would like to see what you have done on the inside! Thanks!
Thank you Karen! I lined the bottom of the inside with cedar paneling and lid with fabric – I have links to these tutorials listed at the end of this post! I hope this helps 🙂
Hi, thanks for sharing this – love the color!
I was wondering if you could give me some paint advice? My old trunk has a glossy finish, I’m guessing someone put green paint over wood. I see most people using chalk paint in these kind of makeovers, but i don’t want a finish Too matte or chalky. Would you suggest chalk + wax, primer + acrylic or latex wall paint?
Thank you!!
Thank you, Liz!
I have never worked with chalk paint and wax, so I can’t speak to how that would perform or hold up on a trunk like this. If yours has a glossy finish, I think you could consider trying a de-glosser on it. At the very least, I would do a bit of light sanding and definitely use a primer. The paint I used was a water-based paint that’s formulated for furniture, and so far it has held up well!
Hi there – was there any reason why you sanded after you painted? I would be concerned about accidentally sanding off the new paint?
Hi Marie, I only sanded the wood pieces on the trunk, not the painted canvas. At this point I can’t remember if I sanded the wood while I was in the cleaning stage, or if I forgot and had to do it after I’d painted the canvas! If it was the latter, I was careful so as not to hit any of the painted parts.
Hi i have the same trunk I just got it. I was wondering where to get parts because I have some hinges that are broke they need nails, I also have broken leather I was wondering where you could get some? I was also wonder what the brand name is? And I was also wonder how to fix the the ripped canvas?
I was never able to find a manufacturer or brand name on my trunk. I didn’t replace any of the hinges or leather; I used a leather cleaner on these straps to clean and condition them. They are in pretty rough shape, but they haven’t fallen off yet. You could consider leather belts, if you can find some that are the same width as the ones on your trunk. As for hinges, I’d probably check my local hardware store. I am not sure about repairing the canvas; I left mine as-in.
This company sells replacement straps, hinges, buckles, handles…..
http://www.stevensantiquetrunks.com/trunklocks.html
Thank you!
I literally have the exact same trunk! Not sure if I want to paint it or not but I love what you did and feel inspired.